package com.example.intentapp1;

import android.app.Activity;
import android.content.Intent;
import android.net.Uri;
import android.os.Bundle;
import android.view.View;
import android.view.View.OnClickListener;
import android.widget.Button;

public class MainActivity extends Activity {

 @Override
 //암시적 인텐트
 protected void onCreate(Bundle savedInstanceState) {
  super.onCreate(savedInstanceState);
  setContentView(R.layout.activity_main);

  Button btn1= (Button)findViewById(R.id.button1);
  Button btn2= (Button)findViewById(R.id.button2);
  Button btn3= (Button)findViewById(R.id.button3);

  btn1.setOnClickListener(new OnClickListener() {

   @Override

   //네이버 인터넷 창 열기
   public void onClick(View v) {
    // TODO Auto-generated method stub
    Intent intent = new Intent(Intent.ACTION_VIEW,Uri.parse("http://www.naver.com"));
    startActivity(intent);
   }
  });
  btn2.setOnClickListener(new OnClickListener() {

   @Override

  //전화걸기 *아래 AndroidManifest에서 permission(허가)을 주어야 바로 전화거 걸립니다
   public void onClick(View v) {
    // TODO Auto-generated method stub
    Intent intent = new Intent(Intent.ACTION_CALL,Uri.parse("tel:010-3163-8067"));
    startActivity(intent);
   }
  });
  btn3.setOnClickListener(new OnClickListener() {

   @Override

  //메세지보내기
   public void onClick(View v) {
    // TODO Auto-generated method stub
    Intent intent = new Intent(Intent.ACTION_VIEW);
    intent.putExtra("sms_body", "Hurry up");
    intent.setType("vnd.android-dir/mms-sms");
    startActivity(intent);
   }
  });

 }
}
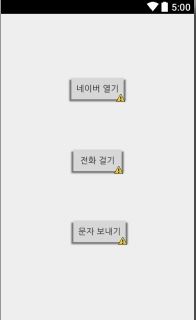
- 버튼클릭시 안드로이드에서 지원하는 암시적인텐트를 사용해서 네이버도 열고 전화도 걸고 문자도 보내보자
- 명시적인텐트는 사용자가 직접 정의해서 다른 액티비티로 이동하는 것이기 때문에 여러개의 .java 파일이 필요하지만 암시적인텐트는 안드로이드 안에 있는 걸 가져다 쓰기 때문에 명령문만 추가해주면 된다
<RelativeLayout xmlns:android="http://schemas.android.com/apk/res/android"
    xmlns:tools="http://schemas.android.com/tools"
    android:layout_width="match_parent"
    android:layout_height="match_parent"
    tools:context="${relativePackage}.${activityClass}" >


    <Button
        android:id="@+id/button1"
        android:layout_width="wrap_content"
        android:layout_height="wrap_content"
        android:layout_below="@+id/textView1"
        android:layout_centerHorizontal="true"
        android:layout_marginTop="100dp"
        android:text="네이버 열기" />

    <Button
        android:id="@+id/button2"
        android:layout_width="wrap_content"
        android:layout_height="wrap_content"
        android:layout_below="@+id/button1"
        android:layout_centerHorizontal="true"
        android:layout_marginTop="71dp"
        android:text="전화 걸기" />

    <Button
        android:id="@+id/button3"
        android:layout_width="wrap_content"
        android:layout_height="wrap_content"
        android:layout_alignLeft="@+id/button2"
        android:layout_below="@+id/button2"
        android:layout_marginTop="70dp"
        android:text="문자 보내기" />

</RelativeLayout>
<?xml version="1.0" encoding="utf-8"?>
<manifest xmlns:android="http://schemas.android.com/apk/res/android"
    package="com.example.intentapp1"
    android:versionCode="1"
    android:versionName="1.0" >

    <uses-sdk
        android:minSdkVersion="8"
        android:targetSdkVersion="21" />

    <uses-permission android:name="android.permission.CALL_PHONE"/>

    <application
        android:allowBackup="true"
        android:icon="@drawable/ic_launcher"
        android:label="@string/app_name"
        android:theme="@style/AppTheme" >
        <activity
            android:name=".MainActivity"
            android:label="@string/app_name" >
            <intent-filter>
                <action android:name="android.intent.action.MAIN" />

                <category android:name="android.intent.category.LAUNCHER" />
            </intent-filter>
        </activity>
    </application>

</manifest>
 간단한 mp3 플레이어 만들기 , 음악넣기 , 노래재생


