1. 테이블 생성하기
| 항목 설명 | 테이블 필드명 | 데이터 타입 | 특성 |
| ID | _id | integer | 유일 값, 자동 증가되는 값 |
| 영화제목 | title | text | |
| 장르 | category | text | |
| 이용 등급 | grade | text |
해당 데이터베이스(DataBase)의 테이블은 영화 정보를 관리하는 테이블로 총 네 가지의 필드를 가집니다. _id 필드는 중복을 허용하지 않으며 1부터 시작하여 레코드가 추가될 때마다 1씩 증가하는 필드입니다. SQLiteDataBase를 통해 해당 Movie 테이블을 생성하는 방법을 보겠습니다.
public class MovieDatabaseManager {
    static final String DB_MOVIE = "Movie.db";   //DB이름
    static final String TABLE_MOVIES = "Movies"; //Table 이름
    static final int DB_VERSION = 1;			//DB 버전

    Context myContext = null;

    private static MovieDatabaseManager myDBManager = null;
    private SQLiteDatabase mydatabase = null;

	//MovieDatabaseManager 싱글톤 패턴으로 구현
    public static MovieDatabaseManager getInstance(Context context)
    {
        if(myDBManager == null)
        {
            myDBManager = new MovieDatabaseManager(context);
        }

        return myDBManager;
    }

    private MovieDatabaseManager(Context context)
    {
        myContext = context;

	//DB Open
        mydatabase = context.openOrCreateDatabase(DB_MOVIE, context.MODE_PRIVATE,null);

        //Table 생성
        mydatabase.execSQL("CREATE TABLE IF NOT EXISTS " + TABLE_MOVIES +
                "(" + "_id INTEGER PRIMARY KEY AUTOINCREMENT," +
                "title TEXT," +
                "category TEXT," +
                "grade TEXT);");
    }
}
▼MovieDatabaseManager는 SQLiteDatabase 객체를 가지고 있는 클래스로 해당 클래스의 유일 객체를 보장하기 위하여 반드시 싱글톤 패턴(Singleton Pattern)을 사용하여 구현합니다. 해당 클래스는 현재 두 개의 생성자 함수를 구현하였으며 하나는 외부에 노출되는 생성자 함수로 myDBManger = null 일 경우에 private 접근 제한이 걸린 내부 생성자 함수를 호출하여 SQLiteDatabase를 생성합니다.
데이터베이스는 openOrCreateDatabase 함수를 통해 열 수 있으며 첫 번째 인자를 생성하거나 Open 할 데이터베이스 명을 넘겨주고 두 번째 인자는 Mode를 설정합니다. context.MODE_PRIVATE Mode는 외부 앱에서 해당 데이터베이스의 접근 권한을 부여하지 않겠다는 것을 의미합니다.
public class MainActivity extends AppCompatActivity {

    @Override
    protected void onCreate(Bundle savedInstanceState) {
        super.onCreate(savedInstanceState);
        setContentView(R.layout.activity_main);

        MovieDatabaseManager databaseManager = MovieDatabaseManager.getInstance(this);

    }
}
▼ MainActivity에서 MovieDatabaseManager 객체를 얻어옵니다.
2. 데이터베이스에 영화 레코드 추가하기
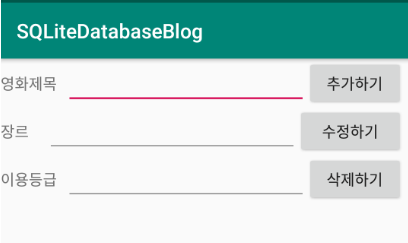
생성된 데이터베이스에 영화 레코드를 추가해보도록 하겠습니다. 먼저 예제의 메인 화면을 구성하는 레이아웃 리소스입니다.
■ /res/layout/main_activity
<?xml version="1.0" encoding="utf-8"?>
<android.support.constraint.ConstraintLayout xmlns:android="http://schemas.android.com/apk/res/android"
    xmlns:app="http://schemas.android.com/apk/res-auto"
    xmlns:tools="http://schemas.android.com/tools"
    android:layout_width="match_parent"
    android:layout_height="match_parent"
    tools:context=".MainActivity">

    <LinearLayout
        android:id="@+id/linearLayout"
        android:layout_width="0dp"
        android:layout_height="wrap_content"
        android:layout_marginEnd="8dp"
        android:orientation="vertical"
        app:layout_constraintEnd_toEndOf="parent"
        app:layout_constraintStart_toStartOf="parent"
        app:layout_constraintTop_toTopOf="parent">

        <LinearLayout
            android:id="@+id/title_layout"
            android:layout_width="match_parent"
            android:layout_height="match_parent"
            android:orientation="horizontal">

            <TextView
                android:id="@+id/textview_title"
                android:layout_width="wrap_content"
                android:layout_height="wrap_content"
                android:layout_weight="1"
                android:text="영화제목" />

            <EditText
                android:id="@+id/edittext_title"
                android:layout_width="wrap_content"
                android:layout_height="wrap_content"
                android:layout_weight="1"
                android:ems="10"
                android:inputType="textPersonName"
                android:text="Name" />

            <Button
                android:id="@+id/btn_add"
                android:layout_width="wrap_content"
                android:layout_height="wrap_content"
                android:layout_weight="1"
                android:onClick="clickHandler"
                android:text="추가하기" />
        </LinearLayout>

        <LinearLayout
            android:id="@+id/category_layout"
            android:layout_width="match_parent"
            android:layout_height="match_parent"
            android:orientation="horizontal">

            <TextView
                android:id="@+id/textview_category"
                android:layout_width="wrap_content"
                android:layout_height="wrap_content"
                android:layout_weight="1"
                android:text="장르" />

            <EditText
                android:id="@+id/edittext_category"
                android:layout_width="wrap_content"
                android:layout_height="wrap_content"
                android:layout_weight="1"
                android:ems="10"
                android:inputType="textPersonName"
                android:text="Name" />

            <Button
                android:id="@+id/btn_modified"
                android:layout_width="wrap_content"
                android:layout_height="wrap_content"
                android:layout_weight="1"
                android:onClick="clickHandler"
                android:text="수정하기" />
        </LinearLayout>

        <LinearLayout
            android:id="@+id/grade_layout"
            android:layout_width="match_parent"
            android:layout_height="match_parent"
            android:orientation="horizontal">

            <TextView
                android:id="@+id/textview_grade"
                android:layout_width="wrap_content"
                android:layout_height="wrap_content"
                android:layout_weight="1"
                android:text="이용등급" />

            <EditText
                android:id="@+id/edittext_grade"
                android:layout_width="wrap_content"
                android:layout_height="wrap_content"
                android:layout_weight="1"
                android:ems="10"
                android:inputType="textPersonName"
                android:text="Name" />

            <Button
                android:id="@+id/btn_delete"
                android:layout_width="wrap_content"
                android:layout_height="wrap_content"
                android:layout_weight="1"
                android:onClick="clickHandler"
                android:text="삭제하기" />
        </LinearLayout>
        1
    </LinearLayout>
</android.support.constraint.ConstraintLayout>

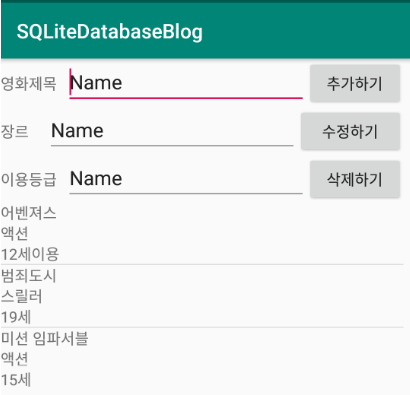
▼ Movie 테이블에 레코드 추가를 위해 각 필드에 대입할 값들을 입력받기 위해 EditText를 배치하였습니다.
수정하기 버튼과 삭제하기 버튼은 구현하지는 않았지만 나중에 나올 예제를 위해 미리 넣었습니다.
public class MainActivity extends AppCompatActivity {

    EditText titleEditText;
    EditText categoryEditText;
    EditText gradeEditText;

    @Override
    protected void onCreate(Bundle savedInstanceState) {
        super.onCreate(savedInstanceState);
        setContentView(R.layout.activity_main);

        MovieDatabaseManager databaseManager = MovieDatabaseManager.getInstance(this);
        this.InitializeView();
    }

    public void InitializeView()
    {
        titleEditText = (EditText)findViewById(R.id.edittext_title);
        categoryEditText = (EditText)findViewById(R.id.edittext_category);
        gradeEditText = (EditText)findViewById(R.id.edittext_grade);
    }

    public void clickHandler(View view)
    {
        switch (view.getId())
        {
            case  R.id.btn_add:
                ContentValues addRowValue = new ContentValues();

                addRowValue.put("title", titleEditText.getText().toString());
                addRowValue.put("category", categoryEditText.getText().toString());
                addRowValue.put("grade", gradeEditText.getText().toString());

                databaseManager.insert(addRowValue);

                break;
        }
    }
}
▼ InitializeView() 함수에서는 EditText의 값을 읽어오기 위해 레이아웃 리소스에 정의된 EditText들의 참조를 얻어옵니다.
▼clickHandler() 함수는 버튼 이벤트 처리를 담당하는 함수입니다. 추가하기 버튼을 클릭하게 되면 ContentValues 객체를 생성하여 put() 함수를 통해 각 필드에 해당하는 값들을 추가해줍니다. ContentValues 클래스는 데이터베이스에 추가하거나 갱신할 데이터를 편리하고 설정하도록 도와주는 클래스입니다.
ContentValues의 put() 함수를 통해 각 필드에 해당하는 데이터를 추가할 수 있는데 첫 번째 인자는 필드명이 오고 두 번째 인자는 해당 필드에 추가할 데이터입니다.
- MovieDatabaseManager.class
    public long insert(ContentValues addRowValue)
    {
        return mydatabase.insert(TABLE_MOVIES, null, addRowValue);
    }
▼ MovieDatabaseManager 클래스 안에 insert() 함수를 추가합니다. 데이터베이스의 특정 테이블에 데이터를 추가 할 때는 insert() 함수를 호출하며 첫 번째 인자는 레코드를 추가하고자 하는 Table의 이름을 전달하고 두 번째 인자는 ContentValues 객체입니다.
3. 데이터 조회하기 (Select)
데이터베이스로부터 데이터를 조회할 때는 query() 함수를 사용합니다. query() 함수의 인자는 총 6개로 정리하면 아래와 같습니다.
| 인자 | type | 설명 |
| 첫 번째 인자 - table 인자 | String | 조회 대상이 되는 테이블명 |
| 두 번째 인자 - colums 인자 | String[] |
조회하고자 하는 Column ex) 영화명과 등급을 조회할 경우 new String[] {"title", "grade"} |
| 세 번째 인자 - selection 인자 | String |
조회 조건을 지정 ex) 액션 영화를 조회하는 경우 category = "액션" |
| 네 번째 인자 - selectionArgs | String[] | selection 인자와 관련이 있는 인자 |
| 다섯 번째 인자 - groupby 인자 | String | 같은 값이 들어간 Column들을 Grouping |
| 여섯 번째 인자 - having 인자 | String | groupby 인자의 조건을 설정합니다. |
| 일곱 번째 인자 - ordet by 인자 | String |
검색된 레코드들을 정렬 _id DES로 지정하면 내림차순으로 정렬 _id ASC로 지정하면 오름차순으로 정렬 |
■ MovieDatabaseManager.class
    public Cursor query(String[] colums,
                        String selection,
                        String[] selectionArgs,
                        String groupBy,
                        String having,
                        String orderby)
    {
        return mydatabase.query(TABLE_MOVIES,
                colums,
                selection,
                selectionArgs,
                groupBy,
                having,
                orderby);
    }
▼ MovieDatabaseManager 클래스 안에 query() 함수를 추가하였습니다.
■ MainActivity.class
    public void getMovieData()
    {
        movieList = new ArrayList<>();

        String[] columns = new String[] {"_id", "title", "category", "grade"};

        Cursor cursor = databaseManager.query(columns, null, null,null,null,null);

        if(cursor != null)
        {
            while (cursor.moveToNext())
            {
                MovieItem currentData = new MovieItem();

                currentData.setId(cursor.getInt(0));
                currentData.setTitle(cursor.getString(1));
                currentData.setCategory(cursor.getString(2));
                currentData.setGrade(cursor.getString(3));

                movieList.add(currentData);
            }
        }
    }
▼ MainActivity 클래스 안에 getMovieData() 함수를 추가하였습니다. columns에 조회하고자 하는 Column 목록을 작성하고 MovieDatabaseManager의 query() 함수를 통해 테이블의 데이터를 조회합니다.
위 예제에서 moviList에 저장되는 데이터는 화면에 ListView를 통해 화면에 표시합니다. ListView 구현과 관련해서는 포스팅 마지막 링크를 참조 바랍니다.

4. 데이터 수정하기
레코드의 특정 Column의 데이터를 수정할 때는 SQLiteDatabase의 update 함수를 사용합니다.
| 인자 | type | 설명 |
| 첫 번째 인자 - table 인자 | String | 레코드를 수정할 테이블명 |
| 두 번째 인자 - values 인자 | CurrentValues |
CurrentValues 객체에 수정하고 싶은 칼럼명과 수정할 값을 추가 |
| 세 번째 인자 - whereClause 인자 | String | 수정할 레코드를 검색하는 조건문 |
| 네 번째 인자 - whereArags 인자 | String[] | whereClause 인자와 관련 |
▼ 반환 값은 수정된 레코드의 개수입니다.
■ MovieDatabaseManager.class
    public int update(ContentValues updateRowValue,
                      String whereClause,
                      String[] whereArgs)
    {
        return mydatabase.update(TABLE_MOVIES,
                updateRowValue,
                whereClause,
                whereArgs);
    }
■ MainActivity.class
    public void clickHandler(View view)
    {
        switch (view.getId())
        {
            case  R.id.btn_add:
                ContentValues addRowValue = new ContentValues();

                addRowValue.put("title", titleEditText.getText().toString());
                addRowValue.put("category", categoryEditText.getText().toString());
                addRowValue.put("grade", gradeEditText.getText().toString());

                databaseManager.insert(addRowValue);
                break;

            case R.id.btn_modified:
                ContentValues updateRowValue = new ContentValues();
                updateRowValue.put("grade", "전체 관람가");

                databaseManager.update(updateRowValue, null, null);
        }
    }
▼ clickHandler 함수에 수정하기 버튼에 대한 이벤트 처리를 위해 case 문을 추가합니다. 해당 예제에서는 그냥 버튼을 클릭하면 grade Column 값을 "전체 관람가"로 변경하도록 구현하였습니다.
5. 데이터 삭제하기
특정 레코드를 삭제할 때는 SQLiteDatabase의 delete() 함수를 사용합니다.
■ MovieDatabaseManager.class
    public int delete(String whereClause,
                      String[] whereArgs)
    {
        return mydatabase.delete(TABLE_MOVIES,
                whereClause,
                whereArgs);
    }
■ MainActivity.class
    public void clickHandler(View view)
    {
        switch (view.getId())
        {
            case  R.id.btn_add:
                ContentValues addRowValue = new ContentValues();

                addRowValue.put("title", titleEditText.getText().toString());
                addRowValue.put("category", categoryEditText.getText().toString());
                addRowValue.put("grade", gradeEditText.getText().toString());

                databaseManager.insert(addRowValue);
                break;
            case R.id.btn_modified:
                ContentValues updateRowValue = new ContentValues();
                updateRowValue.put("grade", "전체 관람가");

                databaseManager.update(updateRowValue, null, null);

            case R.id.btn_delete:
                databaseManager.delete(null, null);
        }
    }
 안드로이드 - 리사이클러 뷰(RecyclerView) 구현