my previous article Android Login and Registration Screen Design i explained designing the login and registration interfaces, but it has no functionality. In this tutorial i am explaining how to build complete login and registration system in android using PHP, MySQL and SQLite. Also this tutorial covers how to build simple API using PHP and MySQL.
Prerequisites
This tutorial is combination of some of my previous tutorials. I hope you covered these tutorials before.
Android making HTTP Requests
Android JSON Parsing Tutorial
Android SQLite Database Tutorial
Android Login and Registration Screen Design
API (Application Programming Interface)
⇒ Accepting requests by GET/POST methods
⇒ Interact with PHP classes to get data from database or store in database
⇒ Finally will give output in JSON format
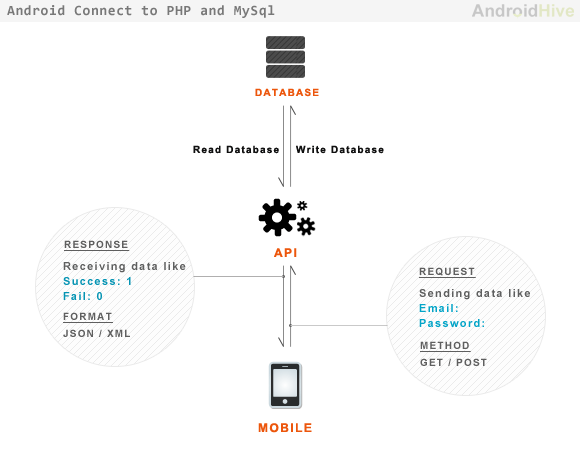
1. Creating MySQL Database and Tables
As I am writing API in PHP I selected MySql database to maintain users and other related information. Open your mysql console or phpmyadmin and run following query to create database and users table.
create database android_api /** Creating Database **/ |
use android_api /** Selecting Database **/ |
create table users( uid int(11) primary key auto_increment, unique_id varchar(23) not null unique, name varchar(50) not null, email varchar(100) not null unique, encrypted_password varchar(80) not null, salt varchar(10) not null, created_at datetime, updated_at datetime null); /** Creating Users Table **/ |
2. Building PHP API Classes
To make it minimum i tried to use less number of php files. Following are the files are required to build API in php. You can find description of each file in the below image.
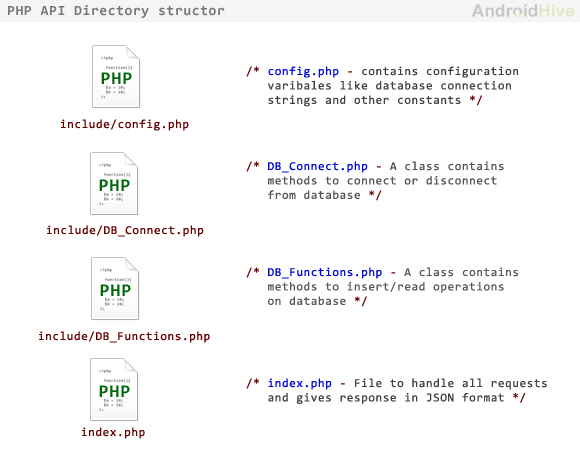
config.php – This file contains constant variables to connect to database.
<?php/** * Database config variables */define("DB_HOST", "localhost");define("DB_USER", "root");define("DB_PASSWORD", "");define("DB_DATABASE", "android_api");?> |
DB_Connect.php – This file is used to connect or disconnect to database.
<?phpclass DB_Connect { // constructor function __construct() { } // destructor function __destruct() { // $this->close(); } // Connecting to database public function connect() { require_once 'config.php'; // connecting to mysql $con = mysql_connect(DB_HOST, DB_USER, DB_PASSWORD); // selecting database mysql_select_db(DB_DATABASE); // return database handler return $con; } // Closing database connection public function close() { mysql_close(); }}?> |
DB_Functions.php – This file contains functions to store user in database, get user from database. You can also add methods like update user, delete user.
user unique id – I am generating unique user id in php using uniqid(”, true) function. Sample user id will be like 4f074eca601fb8.88015924
Encrypted Password – This password is stored using base64_encode method. Each password will need two columns to store in database. one is to store encrypted password and second column is to store salt used to encrypt the password.
<?phpclass DB_Functions { private $db; //put your code here // constructor function __construct() { require_once 'DB_Connect.php'; // connecting to database $this->db = new DB_Connect(); $this->db->connect(); } // destructor function __destruct() { } /** * Storing new user * returns user details */ public function storeUser($name, $email, $password) { $uuid = uniqid('', true); $hash = $this->hashSSHA($password); $encrypted_password = $hash["encrypted"]; // encrypted password $salt = $hash["salt"]; // salt $result = mysql_query("INSERT INTO users(unique_id, name, email, encrypted_password, salt, created_at) VALUES('$uuid', '$name', '$email', '$encrypted_password', '$salt', NOW())"); // check for successful store if ($result) { // get user details $uid = mysql_insert_id(); // last inserted id $result = mysql_query("SELECT * FROM users WHERE uid = $uid"); // return user details return mysql_fetch_array($result); } else { return false; } } /** * Get user by email and password */ public function getUserByEmailAndPassword($email, $password) { $result = mysql_query("SELECT * FROM users WHERE email = '$email'") or die(mysql_error()); // check for result $no_of_rows = mysql_num_rows($result); if ($no_of_rows > 0) { $result = mysql_fetch_array($result); $salt = $result['salt']; $encrypted_password = $result['encrypted_password']; $hash = $this->checkhashSSHA($salt, $password); // check for password equality if ($encrypted_password == $hash) { // user authentication details are correct return $result; } } else { // user not found return false; } } /** * Check user is existed or not */ public function isUserExisted($email) { $result = mysql_query("SELECT email from users WHERE email = '$email'"); $no_of_rows = mysql_num_rows($result); if ($no_of_rows > 0) { // user existed return true; } else { // user not existed return false; } } /** * Encrypting password * @param password * returns salt and encrypted password */ public function hashSSHA($password) { $salt = sha1(rand()); $salt = substr($salt, 0, 10); $encrypted = base64_encode(sha1($password . $salt, true) . $salt); $hash = array("salt" => $salt, "encrypted" => $encrypted); return $hash; } /** * Decrypting password * @param salt, password * returns hash string */ public function checkhashSSHA($salt, $password) { $hash = base64_encode(sha1($password . $salt, true) . $salt); return $hash; }}?> |
index.php – This file plays role of accepting requests and giving response. This file accepts all GET and POST requests. on each request it will talk to database and will give appropriate response in JSON format.
<?php/** * File to handle all API requests * Accepts GET and POST * * Each request will be identified by TAG * Response will be JSON data /** * check for POST request */if (isset($_POST['tag']) && $_POST['tag'] != '') { // get tag $tag = $_POST['tag']; // include db handler require_once 'include/DB_Functions.php'; $db = new DB_Functions(); // response Array $response = array("tag" => $tag, "success" => 0, "error" => 0); // check for tag type if ($tag == 'login') { // Request type is check Login $email = $_POST['email']; $password = $_POST['password']; // check for user $user = $db->getUserByEmailAndPassword($email, $password); if ($user != false) { // user found // echo json with success = 1 $response["success"] = 1; $response["uid"] = $user["unique_id"]; $response["user"]["name"] = $user["name"]; $response["user"]["email"] = $user["email"]; $response["user"]["created_at"] = $user["created_at"]; $response["user"]["updated_at"] = $user["updated_at"]; echo json_encode($response); } else { // user not found // echo json with error = 1 $response["error"] = 1; $response["error_msg"] = "Incorrect email or password!"; echo json_encode($response); } } else if ($tag == 'register') { // Request type is Register new user $name = $_POST['name']; $email = $_POST['email']; $password = $_POST['password']; // check if user is already existed if ($db->isUserExisted($email)) { // user is already existed - error response $response["error"] = 2; $response["error_msg"] = "User already existed"; echo json_encode($response); } else { // store user $user = $db->storeUser($name, $email, $password); if ($user) { // user stored successfully $response["success"] = 1; $response["uid"] = $user["unique_id"]; $response["user"]["name"] = $user["name"]; $response["user"]["email"] = $user["email"]; $response["user"]["created_at"] = $user["created_at"]; $response["user"]["updated_at"] = $user["updated_at"]; echo json_encode($response); } else { // user failed to store $response["error"] = 1; $response["error_msg"] = "Error occured in Registartion"; echo json_encode($response); } } } else { echo "Invalid Request"; }} else { echo "Access Denied";}?> |
Types of API JSON Responses
The following are the different types of JSON responses generated by API.
Registration Success Response – Success Code = 1 (User Successfully Stored)
{ "tag": "register", "success": 1, "error": 0, "uid": "4f074ca1e3df49.06340261", "user": { "name": "Ravi Tamada", "email": "ravi8x@gmail.com", "created_at": "2012-01-07 01:03:53", "updated_at": null }} |
Registration Error Response – Error Code = 1 (Error in storing)
{ "tag": "register", "success": 0, "error": 1, "error_msg": "Error occured in Registartion"} |
Registration Error Response – Error Code = 2 (User Already Existed)
{ "tag": "register", "success": 0, "error": 2, "error_msg": "User already existed"} |
Login Success Response – Success Code = 1 (User Logged in)
{ "tag": "login", "success": 1, "error": 0, "uid": "4f074eca601fb8.88015924", "user": { "name": "Ravi Tamada", "email": "ravi8x@gmail.com", "created_at": "2012-01-07 01:03:53", "updated_at": null }} |
Login Error Response – Error Code = 1 (Login Error – Incorrect username/password)
{ "tag": "login", "success": 0, "error": 1, "error_msg": "Incorrect email or password!"} |
Here it completes the API part and start the Android Project.
3. Starting Android Project
Until now we wrote server side programming to build simple api. Next thing is build android app to interact with the API. In this project i am coding simple app which will have three screens Login Screen, Registration Screen and a welcome Dashboard Screen. So let’s get started by creating new project in you Eclipse IDE.
1. Create a new project by going to File ⇒ New Android Project. Fill all the details and name your activity as DashboardActivity.
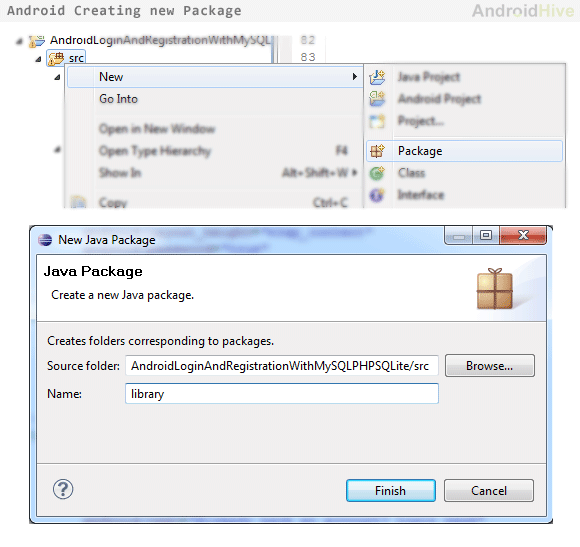
2. Next step is to create a new package to store all our library files. Right Click on ⇒ src ⇒ New ⇒ Package and name it as library.
JSON Parser Class
3. Next we need parser class to parse api response JSON. So create a new class in your library package name it as JSONParser.java and fill it with following code.
package com.example.androidhive.library;import java.io.BufferedReader;import java.io.IOException;import java.io.InputStream;import java.io.InputStreamReader;import java.io.UnsupportedEncodingException;import java.util.List;import org.apache.http.HttpEntity;import org.apache.http.HttpResponse;import org.apache.http.NameValuePair;import org.apache.http.client.ClientProtocolException;import org.apache.http.client.entity.UrlEncodedFormEntity;import org.apache.http.client.methods.HttpPost;import org.apache.http.impl.client.DefaultHttpClient;import org.json.JSONException;import org.json.JSONObject;import android.util.Log;public class JSONParser { static InputStream is = null; static JSONObject jObj = null; static String json = ""; // constructor public JSONParser() { } public JSONObject getJSONFromUrl(String url, List<NameValuePair> params) { // Making HTTP request try { // defaultHttpClient DefaultHttpClient httpClient = new DefaultHttpClient(); HttpPost httpPost = new HttpPost(url); httpPost.setEntity(new UrlEncodedFormEntity(params)); HttpResponse httpResponse = httpClient.execute(httpPost); HttpEntity httpEntity = httpResponse.getEntity(); is = httpEntity.getContent(); } catch (UnsupportedEncodingException e) { e.printStackTrace(); } catch (ClientProtocolException e) { e.printStackTrace(); } catch (IOException e) { e.printStackTrace(); } try { BufferedReader reader = new BufferedReader(new InputStreamReader( is, "iso-8859-1"), 8); StringBuilder sb = new StringBuilder(); String line = null; while ((line = reader.readLine()) != null) { sb.append(line + "\n"); } is.close(); json = sb.toString(); Log.e("JSON", json); } catch (Exception e) { Log.e("Buffer Error", "Error converting result " + e.toString()); } // try parse the string to a JSON object try { jObj = new JSONObject(json); } catch (JSONException e) { Log.e("JSON Parser", "Error parsing data " + e.toString()); } // return JSON String return jObj; }} |
SQLite Database Handler Class
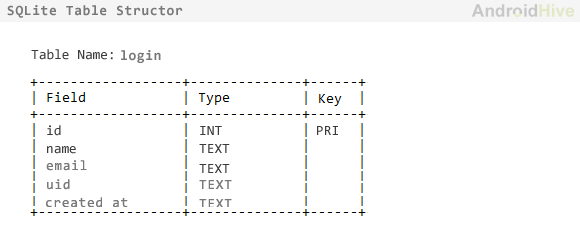
4. In the application to store user information i am using SQLite Database. So create new class in you library package folder and name it as DatabaseHandler.java and fill the class with following code. This class file has functions to handle database operations like storing user and getting user.
package com.example.androidhive.library;import java.util.HashMap;import android.content.ContentValues;import android.content.Context;import android.database.Cursor;import android.database.sqlite.SQLiteDatabase;import android.database.sqlite.SQLiteOpenHelper;public class DatabaseHandler extends SQLiteOpenHelper { // All Static variables // Database Version private static final int DATABASE_VERSION = 1; // Database Name private static final String DATABASE_NAME = "android_api"; // Login table name private static final String TABLE_LOGIN = "login"; // Login Table Columns names private static final String KEY_ID = "id"; private static final String KEY_NAME = "name"; private static final String KEY_EMAIL = "email"; private static final String KEY_UID = "uid"; private static final String KEY_CREATED_AT = "created_at"; public DatabaseHandler(Context context) { super(context, DATABASE_NAME, null, DATABASE_VERSION); } // Creating Tables @Override public void onCreate(SQLiteDatabase db) { String CREATE_LOGIN_TABLE = "CREATE TABLE " + TABLE_LOGIN + "(" + KEY_ID + " INTEGER PRIMARY KEY," + KEY_NAME + " TEXT," + KEY_EMAIL + " TEXT UNIQUE," + KEY_UID + " TEXT," + KEY_CREATED_AT + " TEXT" + ")"; db.execSQL(CREATE_LOGIN_TABLE); } // Upgrading database @Override public void onUpgrade(SQLiteDatabase db, int oldVersion, int newVersion) { // Drop older table if existed db.execSQL("DROP TABLE IF EXISTS " + TABLE_LOGIN); // Create tables again onCreate(db); } /** * Storing user details in database * */ public void addUser(String name, String email, String uid, String created_at) { SQLiteDatabase db = this.getWritableDatabase(); ContentValues values = new ContentValues(); values.put(KEY_NAME, name); // Name values.put(KEY_EMAIL, email); // Email values.put(KEY_UID, uid); // Email values.put(KEY_CREATED_AT, created_at); // Created At // Inserting Row db.insert(TABLE_LOGIN, null, values); db.close(); // Closing database connection } /** * Getting user data from database * */ public HashMap<String, String> getUserDetails(){ HashMap<String,String> user = new HashMap<String,String>(); String selectQuery = "SELECT * FROM " + TABLE_LOGIN; SQLiteDatabase db = this.getReadableDatabase(); Cursor cursor = db.rawQuery(selectQuery, null); // Move to first row cursor.moveToFirst(); if(cursor.getCount() > 0){ user.put("name", cursor.getString(1)); user.put("email", cursor.getString(2)); user.put("uid", cursor.getString(3)); user.put("created_at", cursor.getString(4)); } cursor.close(); db.close(); // return user return user; } /** * Getting user login status * return true if rows are there in table * */ public int getRowCount() { String countQuery = "SELECT * FROM " + TABLE_LOGIN; SQLiteDatabase db = this.getReadableDatabase(); Cursor cursor = db.rawQuery(countQuery, null); int rowCount = cursor.getCount(); db.close(); cursor.close(); // return row count return rowCount; } /** * Re crate database * Delete all tables and create them again * */ public void resetTables(){ SQLiteDatabase db = this.getWritableDatabase(); // Delete All Rows db.delete(TABLE_LOGIN, null, null); db.close(); }} |
User Functions Class
5. Create a new class file under library package and name it as UserFunctions.java. This class will have functions to handle all user events like
loginUser()
registerUser()
getLoginStatus()
logoutUser().
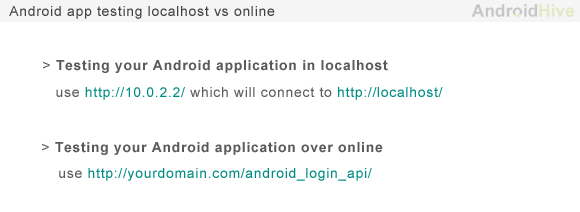
In this class all the functions will interact with JSONParser, DatabaseHandler classes. I am testing API in localhost using xampp software. Normally localhost will run on port http://127.0.0.1 or http://localhost/. In AVD to connect to localhost you need to use url http://10.0.2.2/ instead of http://localhost/. If you want deploy your api on website the use the url http://yoursite.com/api/
package com.example.androidhive.library;import java.util.ArrayList;import java.util.List;import org.apache.http.NameValuePair;import org.apache.http.message.BasicNameValuePair;import org.json.JSONObject;import android.content.Context;public class UserFunctions { private JSONParser jsonParser; // Testing in localhost using wamp or xampp // use http://10.0.2.2/ to connect to your localhost ie http://localhost/ private static String login_tag = "login"; private static String register_tag = "register"; // constructor public UserFunctions(){ jsonParser = new JSONParser(); } /** * function make Login Request * @param email * @param password * */ public JSONObject loginUser(String email, String password){ // Building Parameters List<NameValuePair> params = new ArrayList<NameValuePair>(); params.add(new BasicNameValuePair("tag", login_tag)); params.add(new BasicNameValuePair("email", email)); params.add(new BasicNameValuePair("password", password)); JSONObject json = jsonParser.getJSONFromUrl(loginURL, params); // return json // Log.e("JSON", json.toString()); return json; } /** * function make Login Request * @param name * @param email * @param password * */ public JSONObject registerUser(String name, String email, String password){ // Building Parameters List<NameValuePair> params = new ArrayList<NameValuePair>(); params.add(new BasicNameValuePair("tag", register_tag)); params.add(new BasicNameValuePair("name", name)); params.add(new BasicNameValuePair("email", email)); params.add(new BasicNameValuePair("password", password)); // getting JSON Object JSONObject json = jsonParser.getJSONFromUrl(registerURL, params); // return json return json; } /** * Function get Login status * */ public boolean isUserLoggedIn(Context context){ DatabaseHandler db = new DatabaseHandler(context); int count = db.getRowCount(); if(count > 0){ // user logged in return true; } return false; } /** * Function to logout user * Reset Database * */ public boolean logoutUser(Context context){ DatabaseHandler db = new DatabaseHandler(context); db.resetTables(); return true; } } |
Designing the Screens
6. Until now we have developed the library classes needed in this application. Next thing is build screens. We need three screens Login Screen, Registration Screen and Dashboard Screen.
Create 3 xml files under res ⇒ layout folder and name them as login.xml, register.xml and dashboard.xml
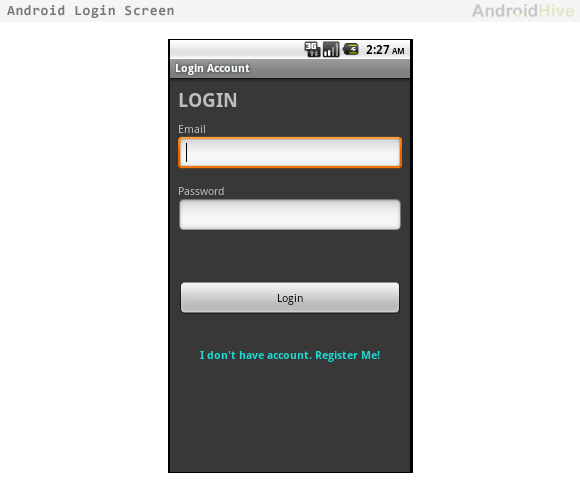
login.xml – login screen design layout
<?xml version="1.0" encoding="utf-8"?> android:layout_width="fill_parent" android:layout_height="fill_parent" android:background="#3b3b3b" > <LinearLayout android:layout_width="fill_parent" android:layout_height="fill_parent" android:orientation="vertical" android:padding="10dip" > <!-- View Title Label --> <TextView android:layout_width="fill_parent" android:layout_height="wrap_content" android:layout_marginBottom="10dip" android:text="LOGIN" android:textSize="25dip" android:textStyle="bold" /> <!-- Email Label --> <TextView android:layout_width="fill_parent" android:layout_height="wrap_content" android:text="Email" /> <!-- Email TextField --> <EditText android:id="@+id/loginEmail" android:layout_width="fill_parent" android:layout_height="wrap_content" /> <!-- Password Label --> <TextView android:layout_width="fill_parent" android:layout_height="wrap_content" android:layout_marginTop="15dip" android:text="Password" /> <!-- Password TextField --> <EditText android:id="@+id/loginPassword" android:layout_width="fill_parent" android:layout_height="wrap_content" android:password="true" /> <!-- Error message --> <TextView android:id="@+id/login_error" android:layout_width="fill_parent" android:layout_height="wrap_content" android:textColor="#e30000" android:padding="10dip" android:textStyle="bold"/> <!-- Login Button --> <Button android:id="@+id/btnLogin" android:layout_width="fill_parent" android:layout_height="wrap_content" android:layout_marginTop="20dip" android:text="Login" /> <!-- Link to Registration Screen --> <Button android:id="@+id/btnLinkToRegisterScreen" android:layout_width="fill_parent" android:layout_height="wrap_content" android:layout_marginTop="40dip" android:background="@null" android:text="I don't have account. Register Me!" android:textColor="#21dbd4" android:textStyle="bold" /> </LinearLayout></ScrollView> |
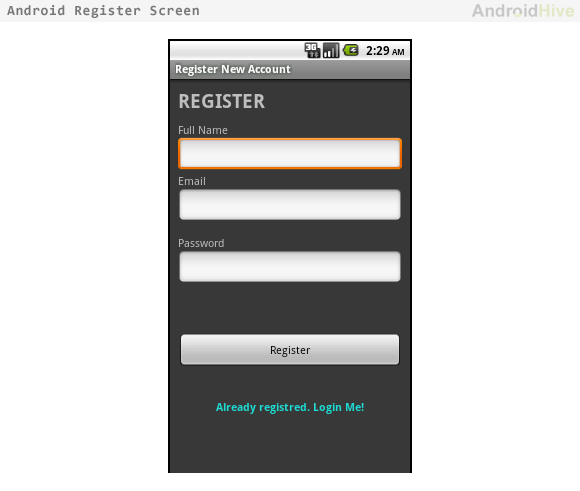
register.xml – registration screen design layout
<?xml version="1.0" encoding="utf-8"?> android:layout_width="fill_parent" android:layout_height="fill_parent" android:background="#3b3b3b" > <LinearLayout android:layout_width="fill_parent" android:layout_height="fill_parent" android:orientation="vertical" android:padding="10dip" > <!-- View Title Label --> <TextView android:layout_width="fill_parent" android:layout_height="wrap_content" android:layout_marginBottom="10dip" android:text="REGISTER" android:textSize="25dip" android:textStyle="bold" /> <!-- Name Label --> <TextView android:layout_width="fill_parent" android:layout_height="wrap_content" android:text="Full Name" /> <!-- Name TextField --> <EditText android:id="@+id/registerName" android:layout_width="fill_parent" android:layout_height="wrap_content" /> <!-- Email Label --> <TextView android:layout_width="fill_parent" android:layout_height="wrap_content" android:text="Email" /> <!-- Email TextField --> <EditText android:id="@+id/registerEmail" android:layout_width="fill_parent" android:layout_height="wrap_content" /> <!-- Password Label --> <TextView android:layout_width="fill_parent" android:layout_height="wrap_content" android:layout_marginTop="15dip" android:text="Password" /> <!-- Password TextField --> <EditText android:id="@+id/registerPassword" android:layout_width="fill_parent" android:layout_height="wrap_content" android:password="true" /> <!-- Error message --> <TextView android:id="@+id/register_error" android:layout_width="fill_parent" android:layout_height="wrap_content" android:textColor="#e30000" android:padding="10dip" android:textStyle="bold"/> <!-- Login Button --> <Button android:id="@+id/btnRegister" android:layout_width="fill_parent" android:layout_height="wrap_content" android:layout_marginTop="20dip" android:text="Register" /> <!-- Link to Login Screen --> <Button android:id="@+id/btnLinkToLoginScreen" android:layout_width="fill_parent" android:layout_height="wrap_content" android:layout_marginTop="40dip" android:background="@null" android:text="Already registred. Login Me!" android:textColor="#21dbd4" android:textStyle="bold" /> </LinearLayout></ScrollView> |
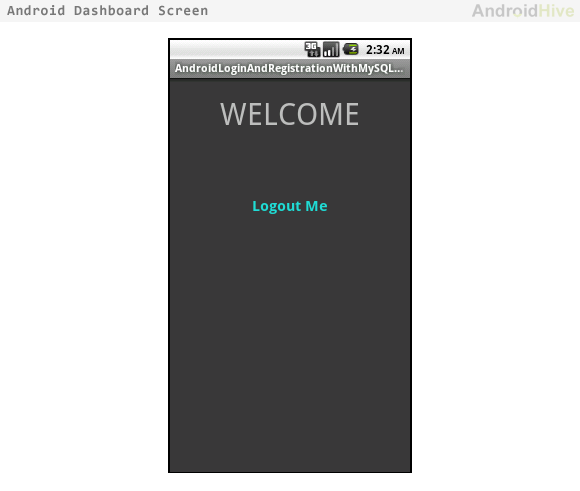
dashboard.xml – dashboard screen design layout
<?xml version="1.0" encoding="utf-8"?> android:layout_width="match_parent" android:layout_height="match_parent" android:orientation="vertical" android:background="#3b3b3b"> <TextView android:layout_width="fill_parent" android:layout_height="wrap_content" android:text="WELCOME" android:textSize="40dip" android:gravity="center" android:layout_marginTop="20dip"/> <Button android:layout_width="fill_parent" android:layout_height="wrap_content" android:text="Logout Me" android:textSize="20dip" android:textColor="#21dbd4" android:textStyle="bold" android:id="@+id/btnLogout" android:layout_marginTop="80dip" android:background="@null"/></LinearLayout> |
Switching between Activites
7. Now the designing part of the app is done next thing is to create activities for each layout and write functionality to achieve login and registration process.
Create new activities LoginActivity.java and RegisterActivity.java and fill them with respective code below.
LoginActivity.java – Activity to handle login event
package com.example.androidhive;import java.util.HashMap;import org.json.JSONException;import org.json.JSONObject;import android.app.Activity;import android.content.Intent;import android.os.Bundle;import android.util.Log;import android.view.View;import android.widget.Button;import android.widget.EditText;import android.widget.TextView;import com.example.androidhive.library.DatabaseHandler;import com.example.androidhive.library.UserFunctions;public class LoginActivity extends Activity { Button btnLogin; Button btnLinkToRegister; EditText inputEmail; EditText inputPassword; TextView loginErrorMsg; // JSON Response node names private static String KEY_SUCCESS = "success"; private static String KEY_ERROR = "error"; private static String KEY_ERROR_MSG = "error_msg"; private static String KEY_UID = "uid"; private static String KEY_NAME = "name"; private static String KEY_EMAIL = "email"; private static String KEY_CREATED_AT = "created_at"; @Override public void onCreate(Bundle savedInstanceState) { super.onCreate(savedInstanceState); setContentView(R.layout.login); // Importing all assets like buttons, text fields inputEmail = (EditText) findViewById(R.id.loginEmail); inputPassword = (EditText) findViewById(R.id.loginPassword); btnLogin = (Button) findViewById(R.id.btnLogin); btnLinkToRegister = (Button) findViewById(R.id.btnLinkToRegisterScreen); loginErrorMsg = (TextView) findViewById(R.id.login_error); // Login button Click Event btnLogin.setOnClickListener(new View.OnClickListener() { public void onClick(View view) { String email = inputEmail.getText().toString(); String password = inputPassword.getText().toString(); UserFunctions userFunction = new UserFunctions(); JSONObject json = userFunction.loginUser(email, password); // check for login response try { if (json.getString(KEY_SUCCESS) != null) { loginErrorMsg.setText(""); String res = json.getString(KEY_SUCCESS); if(Integer.parseInt(res) == 1){ // user successfully logged in // Store user details in SQLite Database DatabaseHandler db = new DatabaseHandler(getApplicationContext()); JSONObject json_user = json.getJSONObject("user"); // Clear all previous data in database userFunction.logoutUser(getApplicationContext()); db.addUser(json_user.getString(KEY_NAME), json_user.getString(KEY_EMAIL), json.getString(KEY_UID), json_user.getString(KEY_CREATED_AT)); // Launch Dashboard Screen Intent dashboard = new Intent(getApplicationContext(), DashboardActivity.class); // Close all views before launching Dashboard dashboard.addFlags(Intent.FLAG_ACTIVITY_CLEAR_TOP); startActivity(dashboard); // Close Login Screen finish(); }else{ // Error in login loginErrorMsg.setText("Incorrect username/password"); } } } catch (JSONException e) { e.printStackTrace(); } } }); // Link to Register Screen btnLinkToRegister.setOnClickListener(new View.OnClickListener() { public void onClick(View view) { Intent i = new Intent(getApplicationContext(), RegisterActivity.class); startActivity(i); finish(); } }); }} |
RegisterActivity.java – Activity to handle registration event
package com.example.androidhive;import org.json.JSONException;import org.json.JSONObject;import com.example.androidhive.library.DatabaseHandler;import com.example.androidhive.library.UserFunctions;import android.app.Activity;import android.content.Intent;import android.os.Bundle;import android.util.Log;import android.view.View;import android.widget.Button;import android.widget.EditText;import android.widget.TextView;public class RegisterActivity extends Activity { Button btnRegister; Button btnLinkToLogin; EditText inputFullName; EditText inputEmail; EditText inputPassword; TextView registerErrorMsg; // JSON Response node names private static String KEY_SUCCESS = "success"; private static String KEY_ERROR = "error"; private static String KEY_ERROR_MSG = "error_msg"; private static String KEY_UID = "uid"; private static String KEY_NAME = "name"; private static String KEY_EMAIL = "email"; private static String KEY_CREATED_AT = "created_at"; @Override public void onCreate(Bundle savedInstanceState) { super.onCreate(savedInstanceState); setContentView(R.layout.register); // Importing all assets like buttons, text fields inputFullName = (EditText) findViewById(R.id.registerName); inputEmail = (EditText) findViewById(R.id.registerEmail); inputPassword = (EditText) findViewById(R.id.registerPassword); btnRegister = (Button) findViewById(R.id.btnRegister); btnLinkToLogin = (Button) findViewById(R.id.btnLinkToLoginScreen); registerErrorMsg = (TextView) findViewById(R.id.register_error); // Register Button Click event btnRegister.setOnClickListener(new View.OnClickListener() { public void onClick(View view) { String name = inputFullName.getText().toString(); String email = inputEmail.getText().toString(); String password = inputPassword.getText().toString(); UserFunctions userFunction = new UserFunctions(); JSONObject json = userFunction.registerUser(name, email, password); // check for login response try { if (json.getString(KEY_SUCCESS) != null) { registerErrorMsg.setText(""); String res = json.getString(KEY_SUCCESS); if(Integer.parseInt(res) == 1){ // user successfully registred // Store user details in SQLite Database DatabaseHandler db = new DatabaseHandler(getApplicationContext()); JSONObject json_user = json.getJSONObject("user"); // Clear all previous data in database userFunction.logoutUser(getApplicationContext()); db.addUser(json_user.getString(KEY_NAME), json_user.getString(KEY_EMAIL), json.getString(KEY_UID), json_user.getString(KEY_CREATED_AT)); // Launch Dashboard Screen Intent dashboard = new Intent(getApplicationContext(), DashboardActivity.class); // Close all views before launching Dashboard dashboard.addFlags(Intent.FLAG_ACTIVITY_CLEAR_TOP); startActivity(dashboard); // Close Registration Screen finish(); }else{ // Error in registration registerErrorMsg.setText("Error occured in registration"); } } } catch (JSONException e) { e.printStackTrace(); } } }); // Link to Login Screen btnLinkToLogin.setOnClickListener(new View.OnClickListener() { public void onClick(View view) { Intent i = new Intent(getApplicationContext(), LoginActivity.class); startActivity(i); // Close Registration View finish(); } }); }} |
DashboardActivity.java – Activity to handle dashboard event
package com.example.androidhive;import android.app.Activity;import android.content.Intent;import android.os.Bundle;import android.view.View;import android.widget.Button;import com.example.androidhive.library.UserFunctions;public class DashboardActivity extends Activity { UserFunctions userFunctions; Button btnLogout; @Override public void onCreate(Bundle savedInstanceState) { super.onCreate(savedInstanceState); /** * Dashboard Screen for the application * */ // Check login status in database userFunctions = new UserFunctions(); if(userFunctions.isUserLoggedIn(getApplicationContext())){ // user already logged in show databoard setContentView(R.layout.dashboard); btnLogout = (Button) findViewById(R.id.btnLogout); btnLogout.setOnClickListener(new View.OnClickListener() { public void onClick(View arg0) { // TODO Auto-generated method stub userFunctions.logoutUser(getApplicationContext()); Intent login = new Intent(getApplicationContext(), LoginActivity.class); login.addFlags(Intent.FLAG_ACTIVITY_CLEAR_TOP); startActivity(login); // Closing dashboard screen finish(); } }); }else{ // user is not logged in show login screen Intent login = new Intent(getApplicationContext(), LoginActivity.class); login.addFlags(Intent.FLAG_ACTIVITY_CLEAR_TOP); startActivity(login); // Closing dashboard screen finish(); } }} |
Finally Updating AndroidManifest.xml
Don’t forget to update you AndroidManifest.xml file. Change following modifications
⇒ Add Internet Persmissions
⇒ Add Entries of each Activity
<?xml version="1.0" encoding="utf-8"?> package="com.example.androidhive" android:versionCode="1" android:versionName="1.0" > <uses-sdk android:minSdkVersion="8" /> <application android:icon="@drawable/ic_launcher" android:label="@string/app_name" > <activity android:label="@string/app_name" android:name=".DashboardActivity" > <intent-filter > <action android:name="android.intent.action.MAIN" /> <category android:name="android.intent.category.LAUNCHER" /> </intent-filter> </activity> <!-- Login Activity --> <activity android:label="Login Account" android:name=".LoginActivity"></activity> <!-- Register Activity --> <activity android:label="Register New Account" android:name=".RegisterActivity"></activity> </application> <!-- Allow to connect with internet --> <uses-permission android:name="android.permission.INTERNET" /></manifest> |
8. Make sure that you have the files placed as in the following image
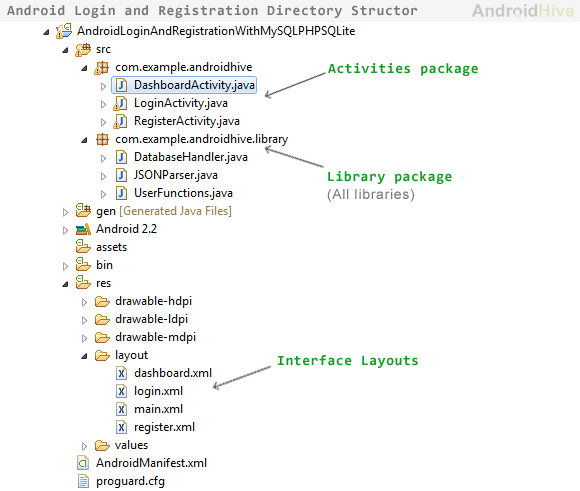
Run your project by right clicking on your project folder ⇒ Run As ⇒ 1 Android Application.
